


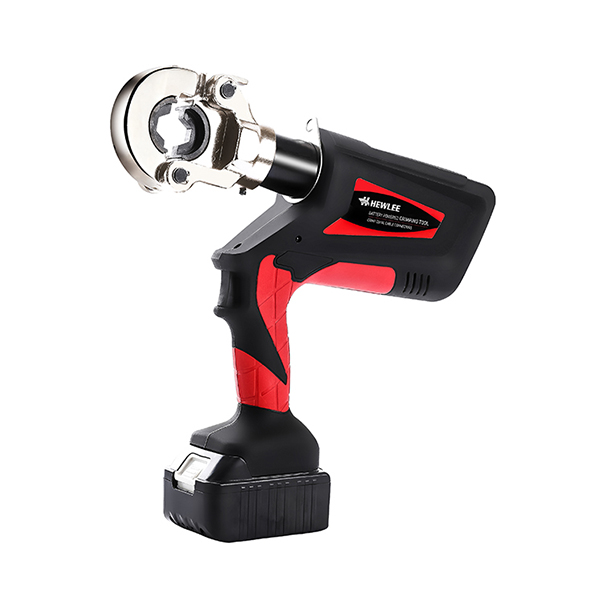
HL-300B is a tool for crimping Cu/Al lugs with cables from 10-300mm2. It is powered by Li-ion, actuated by motor and controlled by MCU. With a high pressure hydraulic system, it is a perfect tool to be used in electrical construction site.
General Safety Rules
To work in safe conditions with this tooling, it is imperative to read carfully the directions for use and to follow the instructions it contains. if you do not respect the information writen in that instruction manual the warranty will be cancelled.
1.Work area safety
a.Keep work area clean and clear. Cluttered or dark areas invite accidents.
b.This tool is not insulated, please do not use it on live conductor.
c.Please do not use or store the tool under high temperature, or one surrounding filling with corrosive fluid. Pay attention to the sealing kits becoming aging.
d.Keep children and bystander away while operating the Battery powered crimping tool. Distractions will cause you to lose control.
2.Electrical safety
e. Make sure the plug matches with the plug seat. Never try any changes on the plug.
f. Do not put tool, battery and charger under a rainy or humid surroundings, it is easy to trigger an electric shock accident if any water goes into the electric system of the tool.
g. Do not use electric wire to carry, pull, or to draw out the plug. The damaged or twined wire may cause an electric shock accident.
h. If the charger was strongly crashed, or dropping down or any other damages happening, please do not try to repair it by yourself, send it back to the authorized service center as soon as possible. The damaged charger may cause an electric shock accident.
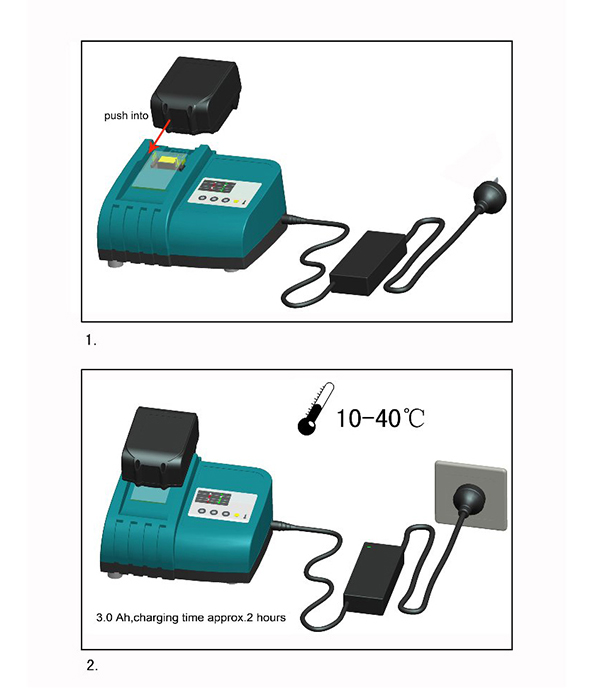
i. The best temperature for charging is between 10℃ - 40℃. Make sure
the air hole of the battery and charger are uncovered during charging.
j. Please pull out the plug when meet a bad weather.
k. Please do not burn the battery or make it being short-circuited, it may
cause explosion.
l. Keep the tool out of reach of children and other person who are not familiar with it.
3. Personal safety
m. Stay alert, watch what you are doing and use common sense when operating the tool. Do not use the tool while you are tired or still under the influence of drugs, alcohol or medication. A moment of inattention may result in series personal injury.
n. Use safety equipment. Always use safety equipment such as mask, helmet, safety cap, insulating shoes and etc to reduce the risk of personal injury.
o. Dress properly. Do not wear loose clothing or jewelry. Keep your hair, clothing and gloves away from moving parts. Loose clothes jewelry or long hair can be caught in moving parts.
p. Maintain power tools. Check for misalignment or binding of moving parts, breakage of parts and any other condition that may effect the tool operation. If damaged, have the tool repaired before use. Many accidents are caused by poorly maintained power tools.
q. Please use the tool properly, the tool with correct power will do the job better and safer at the rate for which it was designed.
r. Do not put your fingers into the head of the tool during operating. Your fingers could be pinched very severely.
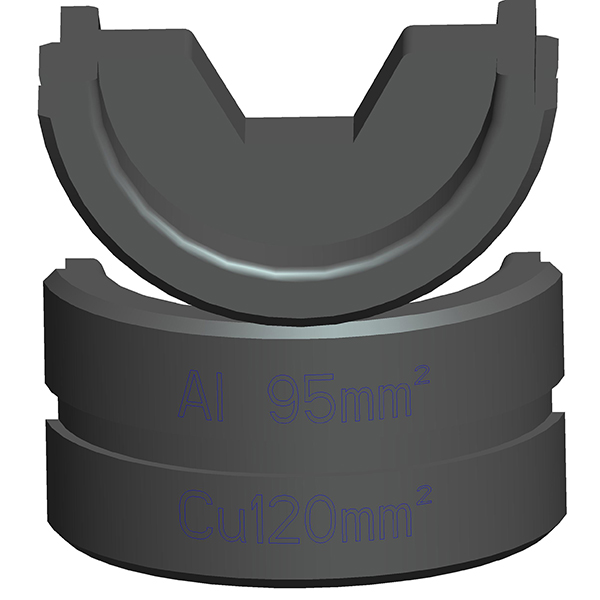 Standard hexagonal die size: 10.16.25.35.50.70.95.120.150.185.240.300 mm2
If ask for special size or special shape, please contact the distributor or manufacturer, they can make die according to detail requirements.

Please select the correct die according to the AL/CU terminal which to be crimped, to choose the wrong die may cause loose crimping result or generate a lot of burs.
Maintenance And Servicing
The tool earns a high precise design, please use it properly and do not disassemble it by unprofessional person, otherwise we will not responsible for the problems cause by above misuse. Or we will carry out repair if the users are willing to pay for the spare parts cost.
1. Keep tool dry. Any water may corrode the tool surface, metal or electrics parts. If contact water, take out the battery and assembly it back when the tool is fully dry.
2. Avoid great temperature fluctuating to the tool. Otherwise it will cause the plastic housing to be deformed, shorten the life span of the electric parts and damage the battery.
3. Please do not use any chemical agent to wash the tool.
4. In order to prolong the life span, please change the hydraulic oil per year.
5. If the tool not used for a long time, please make sure the position stay on its starting position, clear up the tool and paint the rustproof oil both to the tool and accessories. Take out battery and put them into box and store the tool in a dry surrounding.
6. The sealing kit inside the tool will be abraded in some degree after using, when the oil leaking a lot, please contact the distributor to replace the sealing kit in timely.


1.Do not knock any parts of the tool, otherwise it will cause injury.
2.The design of the limit screw on the head is for preventing the head from dropping or popping.
3.Make sure the head was locked firmly during operation.
4.The built-in safety valve goes through strict pressure test before marketing, please do not adjust the pressure by unprofessional person. If the pressure is not enough please return the tools back to the service center, The tool only can be reused after checking and testing trained person.
Understand Your Tool
HL-300B is a tool for crimping Cu/Al lugs with cables from 10-300mm2.
It is powered by Li-ion, actuated by motor and controlled by MCU.
With a high pressure hydraulic system, it is a perfect tool to be used in electrical construction site.
1. Specification
| Max. crimping force: | 60KN |
| Crimping range: | 10-300 mm2 |
| Stroke: | 17mm |
| Hydraulic oil: | Shell Tellus T15# |
| Ambient temperature: | -10 - 40℃ |
| Battery: | 18v 5.0Ah Li-Ion |
| Crimping cycle: | 3s-6s(depending on the connector size) |
| Crimp/charger: | Approx. 260 crimps (Cu150 mm2) |
| Charging voltage: | AC 100V〜240V; 50〜60Hz |
| Charging time: | Approx. 2 hours |
| OLED display: | display voltage, temperature, crimping times, errors information |
| Accessories: | |
| Crimping die (mm2): | 10.16.25.35.50.70.95.120.150.185.240.300 |
| Battery: | 2 pcs |
| Charger: | 1 pcs |
| Sealing ring of cylinder: | 1 set |
| Sealing ring of safety valve: | 1 set |
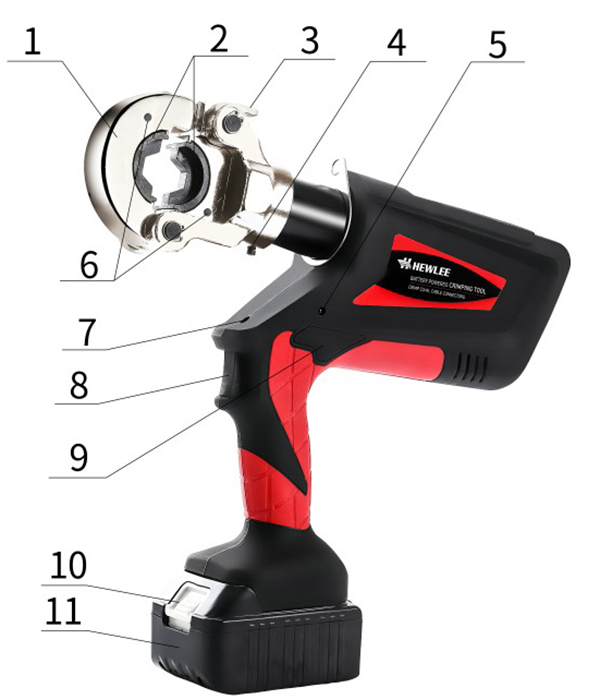
2. Description of components:
|
Parts No. |
Description |
Function |
|
1 |
Die holder | For fixing die |
|
2 |
Die | For crimping, interchangeable die |
|
3 |
Latch | For locking/unlocking the crimping head |
|
4 |
Limited screw | For prevent head from dropping or popping |
|
5 |
LED indicator | For indicating the operating condition and battery discharging situation |
|
6 |
Retaining clips | For locking/unlocking die |
|
7 |
A white Led light | To illuminate the working area |
|
8 |
Trigger | For starting operation |
|
9 |
Retract button | For manual retracting the piston in case of an incorrect operation |
|
10 |
Battery lock | For locking/unlocking the battery |
|
11 |
Battery | For supplying power, rechargeable Li-ion(18V) |
The crimping process can be interrupted at any moment by releasing the trigger.

Do not put your fingers into the head of the tool during operating. Your fingers could be pinched very severely.
The battery can be used for hundreds of times, when the life span reduced obviously, change to a new battery please.
Please charging the battery in time to avoid it to be used up absolutely; otherwise it will become useless forever, if the battery not be used for a long time, it will discharge automatically. Make sure to charge it one time per/each quarter.
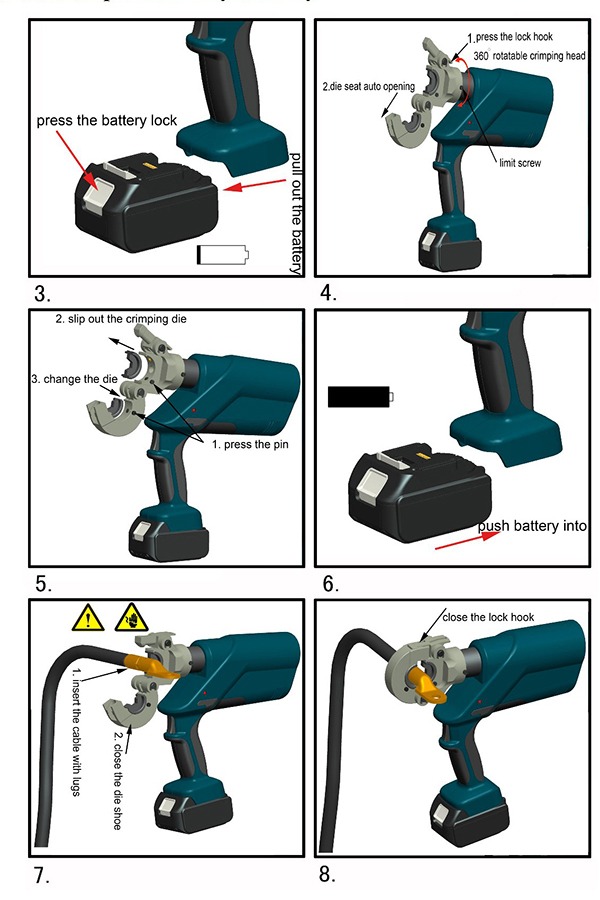
3. Usage of the tool:
1) First you have to check the LED indicator is light or not. If the indicator is light on for more than 5 seconds, it means no power of the battery and should change the full powered battery to settle on the tool
2) Select the right dies for the Intended application.
Don’t operate the tool with our dies.
The crimping head has to be opened by pushing the latch, place two dies up and down after activating the retaining clips. Then the connecting material shall be positioned in the crimping head correctly in order to start the crimping procedure.
3) A crimping process is initiated by switching the trigger. It is defined by the closing motion of the dies. The connection material is positioned in the stationary half of the crimping dies and the moving part is approaching the compression point.
4) A crimping cycle is terminated when the dies contracted each other and when the maximum crimping force is reached. After the crimping cycles is completed the piston retracts automatically. Afterwards a new crimping cycle can be initiated or the crimping process can be terminated by opening the latch and remove the connecting material out of the head.
4. Function description:
1.  MCU - automatically detect the pressure during operation and provide security protect, shut off the motor and reset automatically after operation.
2.  Auto reset - release the pressure automatically, retract the piston to the starting position when reached the max output.
3.  Manual reset - can retract the position to the starting positioning in case of an incorrect crimp
4.  The unit is equipped with a double piston pump which is characterized by a rapid approach of the dies forwards the connector and a slow crimping motion.
5.  The crimping head can be smoothly turned by 360° around the longitudinal axis in order to gain better access to tight corners and other difficult working areas.
6. 
 One significant sound will be heard and a red display flashes if any error occurs.
A white LED illuminates the working space after activating the trigger. It automatically switches off 10 sec. after releasing the trigger.
7.  The whole tool is controlled by one trigger. This results in any easy handing and a better grip compared to a two button operation.
8.  Li-ion batteries do neither have a memory effect nor self discharge. Even after long periods of non operation, the tool is always ready to operate. In addition we see a lower power weight ratio with 50% more capacity and shorter charging cycles compare to Ni-MH batteries.
9. 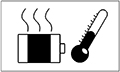 A Temperature sensor makes the tool stop working automatically when the temperature over 60°C under long time working, the fault signal sounds, it means the tool can't continue work until the temperature reduced to the normal.
|
Serious No. |
|
|
Instruction |
What is means |
|
1 |
★ |
● |
Self-checking | Self-checking to assure everything is ok |
|
2 |
★—5sec |
Overload | Hydraulic system may damaged and need check immediately | |
|
3 |
★ ★ ★ |
● ● ● |
Charging signal | Lacking power and need charging |
|
4 |
★—5sec |
●—5sec |
Power lacking warning | No power and need charging immediately |
|
5 |
★★ |
●● |
Temperature warning | Temperature too high and need to cool down |
|
6 |
★★★★ |
●●●● |
No pressure | Motor working but without pressure |


Operating Instruction
Please check carefully before operating. Make sure the tool is complete and has no damage part.
Charging
Push battery into charger and connect the plug, with the plug seat. Make sure the room temperature is between 10℃ - 40℃. The charging time is around 2 hours. Please see the illustration below.
Post time: Jul-13-2022